Happy Stampin’ Monday!
Changes to the blog
Hello fellow stampers! There are going to be some changes beginning this week to the blog posts.
For the last little while I have been posting step-by-step directions to make the daily card/project. Unfortunately, that takes a lot of time to complete Life here at home will be changing and I will not be able to spend as much time at the computer as I did before. But, that does not mean I will stop step-by-step all together. When you sign up for the Weekly Newsletter you will receive links to the step-by-step instructional PDFs on all of my creations. What’s great about this is that you can save the files to your computer to use anytime you’d like, or print them and place them in a binder.
If you are interested in receiving the newsletter, enter your email below.
The Project
Level – Casual (intermediate)

Supply List
- Stamp Sets
- Snowman Season set
- Many Messages set
- Dies/Embossing Folder
- Layering Circle Dies
- Painted Texture 3D Embossing Folder
- Cardstock/DSP
- Night of Navy
- Basic White
- Stamp Pads
- Tuxedo Black (Snowman)
- Craft Stampin’ Ink (Snowflakes)
- Pumpkin Pie (Nose)
- Gray Granite (Stones)
- Stampin’ Blends/Markers
- Wink of Stella pen
- Embellishments
- Black & White Gingham Ribbon
- Adhesive
- Stampin’ Seal
- Stampin’ Dimensionals
- Tools
- Bone Folder
- Tweezers
- Clear (Acrylic) Blocks B & H
- Water Painter Brush
- Paper Snips Scissors
- Paper Trimmer
- Stamparatus
- Simply Scored Scoring Tool
I was inspired by Tina Rappe.
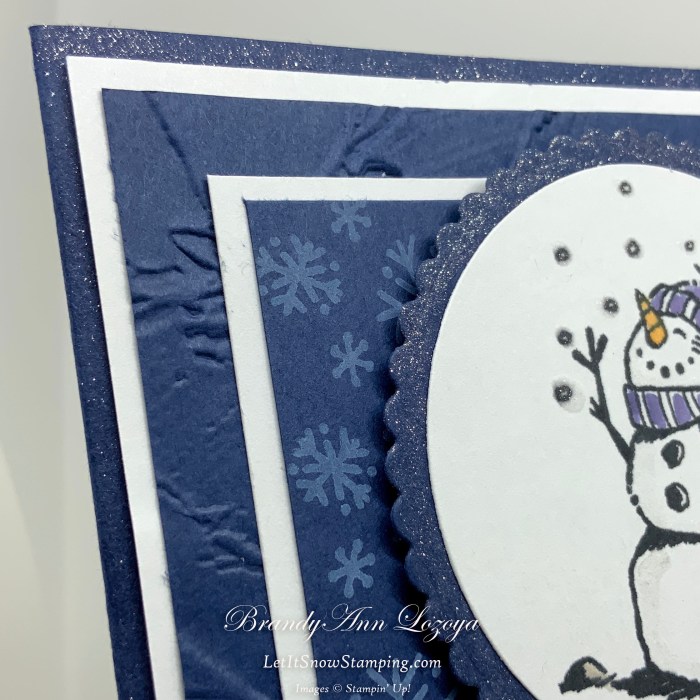
At first I had only added Wink of Stella to the scalloped circle frame, but I needed some balance, so I added it to the outer edges of the card base. It is never too late to add Wink of Stella. It’s precision brush makes it so easy to add sparkle even after the fact!
There are a lot of layers to this card, but that is part of it’s charm. However, be careful if you want too add extras later (newsletter, die cuts for a friend, etc.) because with the A2 envelope, this card weight 0.9 oz and that is without the return address label and stamp! If it is 1.0 oz, it will require more postage.
You can lighten the load though by cutting out the center of the first white mat and use Baker’s twine or another lighter type of ribbon.
Cheater bow. Cut a 6″ length of ribbon and run it across the front of the card, then tape the ends to the back of the layers. Then cut a 4″ length and tie it to the 6″length in a simple knot.

I have a container with pre-made sentiments from the Many Messages bundle to add whenever I need a cute and small sentiment.

Today I stamped and matted the inside sentiment. I also used Wink of Stella along the Night of Navy mat edges to match the front.

Again, if you would still like to receive the step-by-step instructional PDF for the projects featured each week, simply subscribe to the Weekly Newsletter!
Have an AWESOME day!
~BrandyAnn

When ordering use my name and the October 2021 host code for extra benefits
BrandyAnn Lozoya
DKGKTMQ2
I hope you enjoyed today’s project. Make sure to subscribe to Let It Snow Stamping so you never miss another blog post. This is different from the Weekly Newsletter. Every week I pick a stamp set and make one project every weekday. As an added bonus I also make videos for new techniques. The techniques can also be found under the Technique Corner tab.
Make sure you find LISS on:
Facebook (#LISStamping, @LetItSnowStamping),
Instagram (@LetItSnowStamping),
