Happy Thursday! However, I keep thinking it is Friday! I have been off by one day all week, LOL.
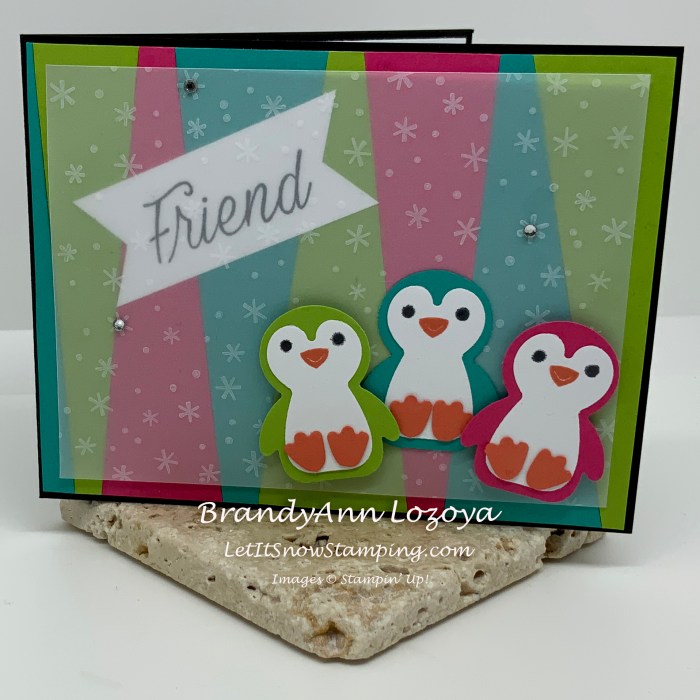
I am so excited to share today’s project with you! It is so bright and cheerful and the little penguins are just adorable! The dark card base intensifies the tropical colors and the stamped vellum softens them to let the penguins shine.
Project:
Supply List:
- Penguin Place Bundle
- Basic Black cardstock – 11″x4-1/4″, scored and folded at 5-1/2″
- Basic White cardstock – Two panels 4-1/8″x5-3/8″, scrap piece for sentiment and penguin middles
- Background & Penguin cardstock colors – Bermuda Bay, Melon Mambo, Granny Apple Green, Calypso Coral
- Vellum Cardstock 5″x3-3/4″
- Ink – Calypso Coral, Tuxedo Black, Whisper White Pigment
- Rhinestone Basic Jewels
- Stampin’ Dimensionals
- Mulitpurpose Liquid Glue
Click on the SHOP NOW button below to purchase supplies
Instructions:
Begin by cutting your card base using Basic Black cardstock to measure 11″x4-1/4″, score and fold at 5-1/2″.
Adhere one of the white panels to the inside of the card base.
Cut strips of colored cardstock (Bermuda Bay, Melon Mambo, and Granny Apple Green) using a paper trimmer. I cut mine in small angles for more character.
Arrange and glue strips to the second white panel.
Here is the backside. Luckily my ‘oops’ will get cut off!


Next, cut off hanging edges with scissors.


Now, mount this card front to the card base.
Using the white pigment ink and snowflake stamp, stamp a background by placing the stamp in various locations on the vellum. Let dry.

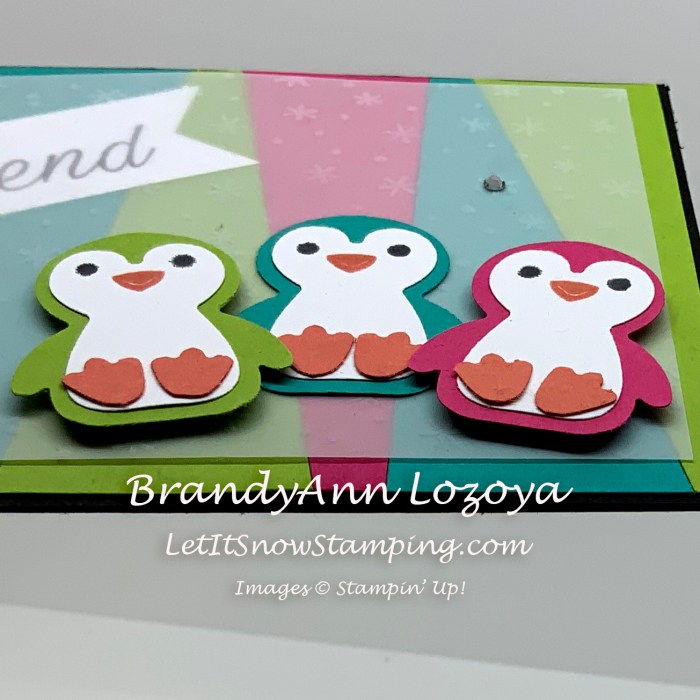
Using the Penguin Builder Punch, punch out a penguin in Melon Mambo, Bermuda Bay and Granny Apple Green. Then punch out 3 white penguin middles and 6 feet in Calypso Coral.
Using Tuxedo Black, stamp the eyeballs on the white penguin middles and use Calypso Coral to stamp the beak under the eyeballs.

Glue penguin middles to the penguin bodies. Centering as best you can.

Glue feet onto each penguin.

When the vellum is dry, center it on the card base for placement and position penguins in the lower right hand corner.

I glued down my blue penguin with regular tape adhesive and used Stampin’ Dimensionals for the green and pink penguins for a bit more dimension.
To adhere the vellum to the card base, add tape runner behind each penguin.

Stamp your sentiment in Tuxedo black onto a scrap piece of white cardstock and glue down under the vellum. I was going to put it on top, but it was to bright and loud and took away from the penguins. Putting it behind the vellum softened it up a bit and it showcases the snowflakes you worked so hard to stamp onto the vellum and not smudge! I used the ‘Friend’ stamp from Daisy Lane. I wanted something sweet and simple, yet bold to match the rest of the card.
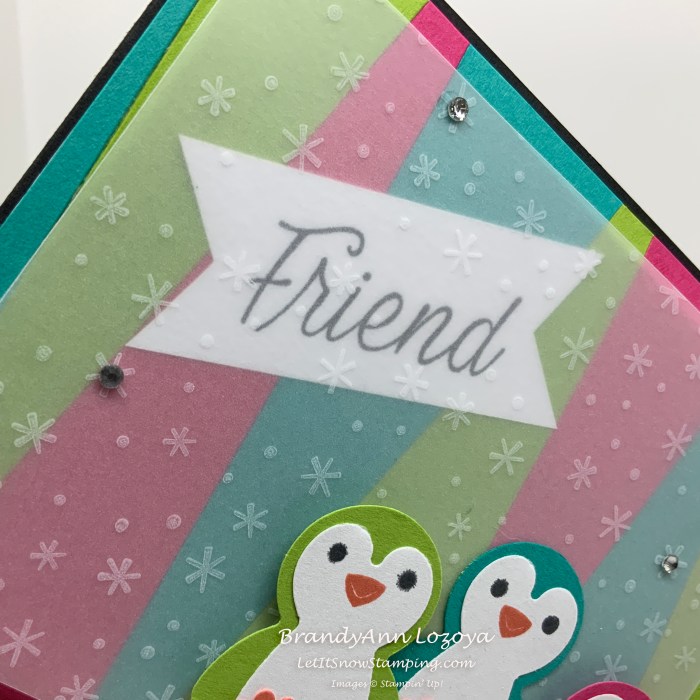
Don’t forget to add some bling as well!

I hope you enjoyed today’s project. Make sure to subscribe to Let It Snow Stamping so you never miss another blog post. Every week I pick a stamp set and make one project (possibly two) every weekday. As an added bonus I also make videos for new techniques. The techniques can also be found under the Technique Corner tab.
Make sure you find LISS on:
Facebook (#LISStamping, @LetItSnowStamping),
Instagram (@LetItSnowStamping),
