Happy Stampin’ Thursday!
I absolutely love today’s project. I spent a lot of time staring at all of our blue Classic Stampin’ Pads today trying to figure out which one I wanted to use. I finally settled on Balmy Blue and think I made the right decision.
The Project
Level – Casual (Intermediate)

Supply List
- Stamp Sets
- Textures & Frames Sale-A-Bration Photopolymer Stamp Set
- Prince & Princess Photopolymer Host Stamp Set
- Die Sets
- Floral Gallery Dies set
- Stitched So Sweetly Dies set
- Cardstock
- Balmy Blue – Card Base measures 5-1/2″x8-1/2″, scores and folded at 4-1/4″
- Basic White – Scraps for largest rectangle die in Stitched So Sweetly Dies set is roughly 4-1/4″x2-3/4″, card front 5-1/4″x4″, scrap for small sentiment
- Classic Stampin’ Pads
- Balmy Blue
- Smoky Slate
- Stampin’ Blends
- Light Smoky Slate
- Light Cajun Craze
- Wink of Stella
- Embellishments
- Pearl Basic Jewels
- Adhesive
- Stampin’ Seal
- Mini Stampin’ Dimensionals
- Tools
- Bone Folder
- Paper Trimmer
- Stampin’ Cut & Emboss Machine
Instructions
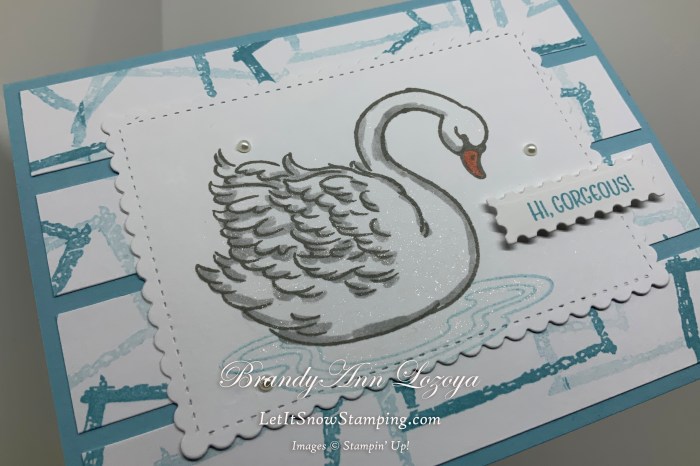
Begin by folding the card base and burnishing it with the bone folder for a nice crisp fold.

Using the open rectangle stamp from Textures & Frames, stamp with Balmy Blue in a random order. Stamp twice before re-inking for the different shades.

Next, cut card front into 4 pieces measuring 5-1/4″x 3/4″.

Adhere strips to the card base. I glued down the top and bottom pieces first in order to make it easier to space out the middle pieces evenly.


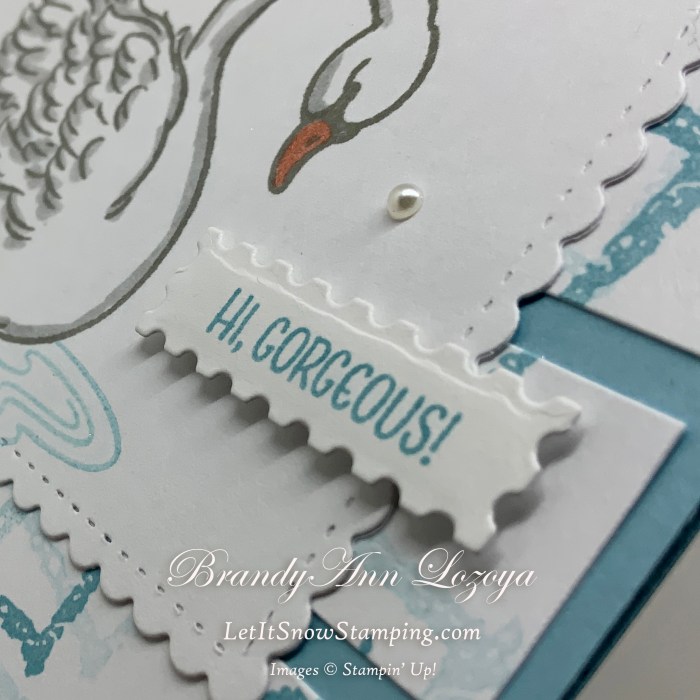
Stamp swan from the Prince & Princess set in Smoky Slate.
Cut out swan using the largest rectangle in the Stitches So Sweetly Dies set.

Stamp the water using Balmy Blue. To make it lighter, I stamped the first image on a sheet of scrap paper before stamping onto my cardstock. I did not want it to over power my swan.

Color in gray highlights and the beak using the Stampin’ Blends markers.


Color in swan and water with the Wink of Stella marker for some added sparkle.

Stamp sentiment in Balmy Blue on a scrap of Basic White.
Using the small sentiment box from the Floral Gallery Dies set, cut out sentiment.

Adhere swan to card base.

Add Mini Stampin’ Dimensionals to the back of the sentiment and adhere to card front.


Add three pearls to accent the swan.
The Final Project
Announcements:
Virtual Party: On September 11, 2021, I will be hosting a Virtual Party where I will be showcasing two projects using two of the holiday bundles from the new July-December Mini Catalog, as well as doing fun giveaways!
If you book an event during the Virtual Party, you will receive one free Classic’ Stampin’ Pad of your choice on top of the regular hostess rewards.
September Special: Buy the Merry Snowflakes Bundle (page 13 in the July-December Mini Catalog) and receive a roll of the White 3/8″ Glittered Organdy Ribbon FREE! (While Supplies Last)
I hope you enjoyed today’s project. Make sure to subscribe to Let It Snow Stamping so you never miss another blog post. Every week I pick a stamp set and make one project every weekday. As an added bonus I also make videos for new techniques. The techniques can also be found under the Technique Corner tab.
When ordering use my name and the August 2021 host code for extra benefits
BrandyAnn Lozoya
A69ERDDQ
Make sure you find LISS on:
Facebook (#LISStamping, @LetItSnowStamping),
Instagram (@LetItSnowStamping),
