Happy Stampin’ Wednesday!
I have a wonderful card today! As a mom of three boys I gone from loving blue to loving PINK! I originally thought if I had pink and blingy things, the boys would leave them alone. Well, they proved me wrong! They will ride a pink bike, sport a blingy key chain, and use my pink pillows because they are more comfy. Ugh! Go figure, LOL.
That being said, I have a wonderfully pink card for you today! But first, let’s get the announcements out of the way :)
Announcements:
Virtual Party: On September 11, 2021, I will be hosting a Virtual Party where I will be showcasing two projects using two of the holiday bundles from the new July-December Mini Catalog, as well as doing fun giveaways!
If you book an event during the Virtual Party, you will receive one free Classic’ Stampin’ Pad of your choice on top of the regular hostess rewards.
September Special: Buy the Merry Snowflakes Bundle (page 13 in the July-December Mini Catalog) and receive a roll of the White 3/8″ Glittered Organdy Ribbon FREE!
The Project:
Level: Avid (Advance)

Supply List:
- Stamp Sets
- Textures & Frames Sale-A-Bration Photopolymer Stamp Set
- Art Gallery Photopolymer Stamp Set
- Die Sets
- Floral Gallery Dies set
- Stitched So Sweetly Dies set
- Cardstock
- Blushing Bride – Card front measures 4″x5-1/4″
- Basic White – Card base measures 8-1/2″x5-1/2″, scored and folded at 4-1/4″, scraps for flowers and sentiments
- Vellum – Scrap piece for rectangle die cut
- Classic Stampin’ Pads
- Blushing Bride
- Mossy Meadow
- Embellishments
- Crinkled Seam Binding Ribbon
- Subtle Shimmer Sequins
- Adhesive
- Stampin’ Seal
- Stampin’ Dimensionals
- Mini Glue Dots
- Tools
- Bone Folder
- Paper Trimmer
- Simply Scored Scoring Tool
- Stampin’ Cut & Emboss Machine
Instructions:
Begin by scoring the white card base at 4-1/4″ using the Simply Scored Scoring Tool.

Next, fold and burnish with a bone folder for a crisp edge.

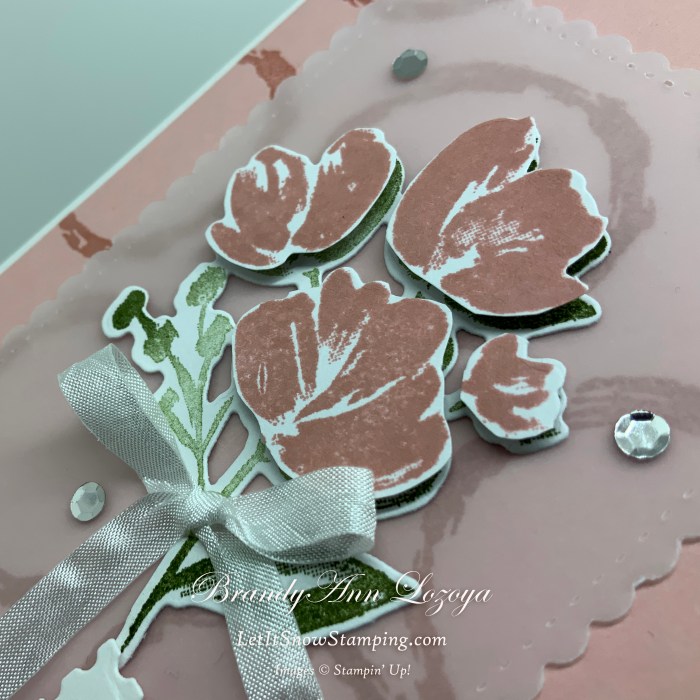
Using Blushing Bride Classic Stampin’ Pad, create background on Blushing Bride card front, using the open circle from the Textures & Frames Photopolymer Stamp Set. Stamp the circles randomly around the card front. Remember to allow some of them to “fall off” the page.

Now, adhere the card front to the card base using the Stampin’ Seal adhesive.

Cut Vellum Cardstock using the largest rectangle frame from the Stitched So Sweetly Dies set.
Mount rectangle to card front. Only add adhesive to the middle of the vellum so it will be hidden by the flower element.


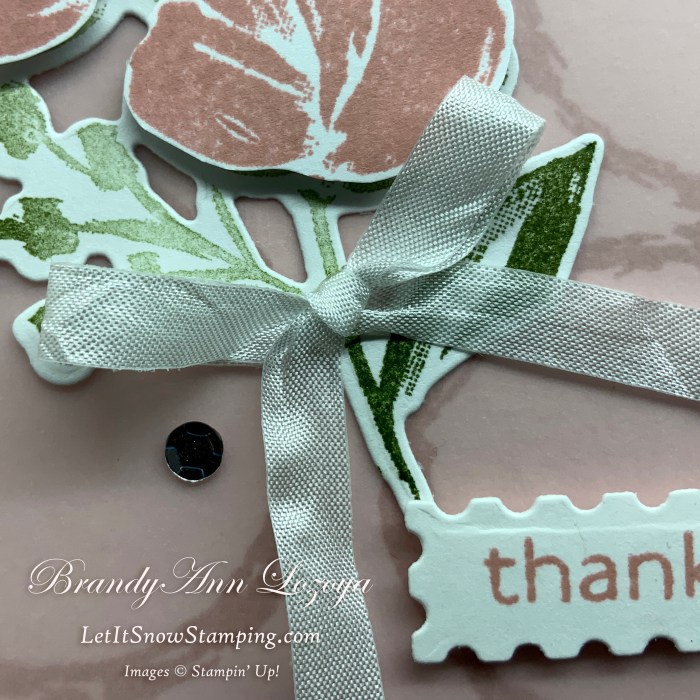
Stamp one of the flowers from the Art Gallery stamp set in both Mossy Meadow and Blushing Bride.
Fussy cut the blossoms from the Blushing Bride image.


Add Mini Stampin’ Dimensionals to the cut out blossoms and place on the Mossy Meadow image as shown below.


Adhere flowers to card front.

Cut a 7″ length of ribbon and tie a simple bow.
Using a Mini Glue Dot, adhere the bow to the flower stem.
Trim edges of the bow, if needed.


Stamp sentiment on the scrap of Basic White cardstock using the Blushing Bride Classic Stampin’ Pad.
Cut out with the small scalloped rectangle from the Floral Gallery Dies set.
Adhere it to the card front using dimensionals.


Add three sequins to the card front
The Finished Project
I hope you enjoyed today’s project. Make sure to subscribe to Let It Snow Stamping so you never miss another blog post. Every week I pick a stamp set and make one project every weekday. As an added bonus I also make videos for new techniques. The techniques can also be found under the Technique Corner tab.
When ordering use my name and the August 2021 host code for extra benefits
BrandyAnn Lozoya
A69ERDDQ
Make sure you find LISS on:
Facebook (#LISStamping, @LetItSnowStamping),
Instagram (@LetItSnowStamping),
