Happy Stampin’ Tuesday!
Today I an antique look for today’s project. Mossy Meadow and Crumb Cake work well together for this effect.
The Project
Level – Casual (Intermediate)

Supply List
- Stamp Sets
- Sale-A-Bration Feels Like Home Cling Stamp Set
- Free reward with a purchase of $50 or more until September 30th, 2021
- Sale-A-Bration Feels Like Home Cling Stamp Set
- Die Sets/Embossing Folder
- Stitched So Sweetly Dies set
- Tasteful Textile 3D Embossing Folder
- Cardstock/DSP
- Mossy Meadow
- Card Base measures 5-1/2″x8-1/2″, scored and folded at 4-1/4″
- Basic White
- Inside panels measure 5-1/4″x4″
- Sentiment layer measures 2-1/2″x5/8″
- Mossy Meadow
- Stamp Pads
- Crumb Cake
- Stampin’ Blends
- Light Crumb Cake
- Embellishments
- Pearl Basic Jewels
- Scalloped Lace Trim
- (Retired) Mossy Meadow Braided Linen Trim
- Adhesive
- Stampin’ Seal
- Mini Glue Dots
- Tools
- Bone Folder
- Blending Brush
- Clear (Acrylic) Block B, C, & H
- Paper Snips Scissors
- Paper Trimmer
- Simply Scored Scoring Tool
- Stamparatus
- Stampin’ Cut & Emboss Machine
Instructions
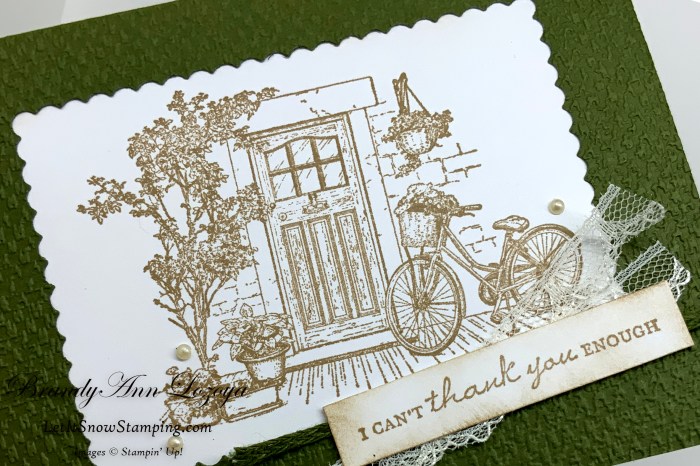
Begin by folding card base at score line and burnish with a bone folder for a nice crisp fold.


Next, using the largest scalloped rectangle in the Stitched So Sweetly Dies set, cut a scalloped frame on the front side of the card base.


Using the Tasteful Textile 3D Embossing Folder, add texture to the framed side of the card base.
*Hint – Line up fold to the edge of the texturing on the embossing folder to avoid a blank spot on the top front of your card base.


On one of the white inside panels, stamp the image in Crumb Cake in the center of the cardstock using the Stamparatus for a nice crisp image.
Need a lesson on how to use the Stamparatus stamping platform? Click Here


Carefully add Stampin’ Seal adhesive to the edge of the stamped image to adhere it to the inside of the framed card base. We want the imaged glued to the front flap of the card base.

Stamp vine stamp along one edge of the second inside panel and the potted plant in the bottom right corner. I also used a blending brush to add color to the edges of the panel.


Adhere the panel to the inside of the card.

Now, stamp the sentiment on the small sentiment piece using Crumb Cake ink.

Add a strip of Stampin’ Seal adhesive to the back side of the sentiment and attach the two pieces of ribbon.


Add three Mini Glue Dots to the back of the ribbon to adhere to the card front. I used my Take Your Pick Tool’s spatula point to attach the glue dot to the ribbon.


Attach sentiment embellishment to the card front.

Color three Pearl Basic Jewels with the Light Crumb Cake Stampin’ Blends marker to give them an antiqued look and place them on the card front.


The Final Project


September Special

Merry Snowflakes Bundle 
White 3/8″ Glittered Organdy Ribbon
September Special: Buy the Merry Snowflakes Bundle* (page 13 in the July-December Mini Catalog) and receive a roll of the White 3/8″ Glittered Organdy Ribbon FREE! (While Supplies Last)
*Orders must be placed via email and not through the online store.

When ordering use my name and the September 2021 host code for extra benefits
BrandyAnn Lozoya
A69ERDDQ
I hope you enjoyed today’s project. Make sure to subscribe to Let It Snow Stamping so you never miss another blog post. Every week I pick a stamp set and make one project every weekday. As an added bonus I also make videos for new techniques. The techniques can also be found under the Technique Corner tab.
Make sure you find LISS on:
Facebook (#LISStamping, @LetItSnowStamping),
Instagram (@LetItSnowStamping),
