Happy Stampin’ Monday!
I hope everyone had a relaxing and wonderful weekend! I had fun with all of you at the Virtual Party on Saturday and loved the DCMS session on Sunday too! If you don’t know, these two events happen on the LISS FB Group. DCMS (Drink Coffee, Make Stuff) happens every Sunday at 10am CDT.
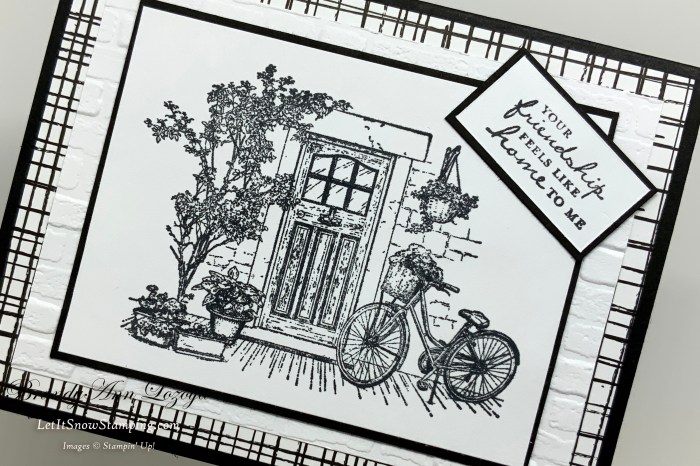
This week’s stamp set is the Sale-A-Bration Feels Like Home set. (It is not available for purchase, but you can earn it as a FREE reward with any $50 purchase until September 30, 2021.) I have seen so many beautiful cards made with this set. Most of them have been expertly colored in with different types of mediums – pencils, markers, chalk, etc. However, today I wanted to create a black and white card and this beautiful porch looked so welcoming.
The Project
Level – Beginner to Casual (Intermediate)

Supply List
- Stamp Sets
- Sale-A-Bration Feels Like Home Cling Stamp Set
- Free reward with a purchase of $50 or more until September 30th, 2021
- Sale-A-Bration Feels Like Home Cling Stamp Set
- Die Sets/Embossing Folder
- Brick & Mortar 3D Embossing Folder
- Cardstock/DSP
- Basic Black
- Card Base measures 5-1/2″x8-1/2″, scored and folded at 4-1/4″
- Large image mat measures 4-1/8″x3-1/8″
- Sentiment mat measures 1-5/8″x7/8″
- Pattern Party Host Designer Series Paper
- 5-1/4″x4″
- Basic White
- Inside panel measures 5-1/4″x4″
- Image layer measures 4″x3″
- Embossed layer measures 4-3/4″x3-1/2″, before embossing
- Sentiment layer measures 1-1/2″x3/4″
- Basic Black
- Stamp Pads
- Momento Tuxedo Black
- Adhesive
- Stampin’ Seal
- Tools
- Bone Folder
- Clear (Acrylic) Block B
- Paper Trimmer
- Simply Scored Scoring Tool
- Stamparatus
- Stampin’ Cut & Emboss Machine
Instructions
Begin by folding and burnishing your card base with a Bone Folder.

Adhere Designer Series Paper layer onto the front of the card base.

Emboss the larger Basic White layer with the Brick & Mortar 3D Embossing Folder and adhere it to the card base on top of the DSP.

Today I used my Stamparatus to stamp my image. Such detailed stamps sometimes have a hard time stamping completely the first go, so I always use my Stamparatus for them. If you would like to see how to use the Stamparatus CLICK HERE.
Stamp the image in Momento Tuxedo Black ink.

Now, adhere the stamped image onto the Basic Black mat.

Then, adhere it to the card base.

Stamp the sentiment on the small piece of Basic White cardstock using Tuxedo Black ink.

Adhere the sentiment onto the small black mat and adhere to the card front on the upper right side.


To finish off the card, stamp the potted plant image on the inside panel and adhere to the inside of the card.


You can always add rhinestones or pearls to bling it up a bit, but today I wanted to stay simple and I am happier for it. What do you think?
The Final Project


September Special

Merry Snowflakes Bundle 
White 3/8″ Glittered Organdy Ribbon
September Special: Buy the Merry Snowflakes Bundle* (page 13 in the July-December Mini Catalog) and receive a roll of the White 3/8″ Glittered Organdy Ribbon FREE! (While Supplies Last)
*Orders must be placed via email and not through the online store.

When ordering use my name and the September 2021 host code for extra benefits
BrandyAnn Lozoya
A69ERDDQ
I hope you enjoyed today’s project. Make sure to subscribe to Let It Snow Stamping so you never miss another blog post. Every week I pick a stamp set and make one project every weekday. As an added bonus I also make videos for new techniques. The techniques can also be found under the Technique Corner tab.
Make sure you find LISS on:
Facebook (#LISStamping, @LetItSnowStamping),
Instagram (@LetItSnowStamping),
