Happy Stampin’ Tuesday!
Holy Moly Cannoli! What a crazy busy day. It is almost 9pm and I am just now getting to write today’s blog post. How is your week shaping up? Hopefully mine will slow down a bit now, but I have a lot of planning to do this week. I want to add a couple of classes and maybe a small stamp camp at the end of October to make holiday cards. So, keep an eye out on the events page and blog posts for upcoming events!
Don’t miss out on free Sale-A-Bration rewards this week! SAB ends on Thursday. With every $50 or $100 purchase you receive a free SAB item of your choice. Click on the following links to view the reward choices.
Anniversary Special
Now through September 30th
Buy one of the following sets to make special wedding and anniversary cards and receive a free package of the Pearl Basic Jewels*
- Forever Blossoms
- Always in My Heart
- Elegantly Said
- Art Gallery
*Orders must be placed via email and not through the online store to receive offer.

Forever Blossoms 151457 
Always in My Heart 158183 
Elegantly Said 155095 
Art Gallery 158201

September Special

Merry Snowflakes Bundle 
White 3/8″ Glittered Organdy Ribbon
September Special: Buy the Merry Snowflakes Bundle* (page 13 in the July-December Mini Catalog) and receive a roll of the White 3/8″ Glittered Organdy Ribbon FREE! (While Supplies Last)
*Orders must be placed via email and not through the online store to receive offer.
The Project
Level – Casual (Intermediate)

Supply List
- Stamp Sets
- Sweet Little Stockings set
- Dies/Embossing Folders
- Stockings Dies
- Brick & Mortar 3D Embossing Folder
- Cardstock/DSP
- Merry Merlot
- Card Base measures 5-1/2″x8-1/2″, scored and folded at 4-1/4″
- Sentiment measures 3-1/2”x1”
- Sweet Stockings Designer Series Paper
- Card front measures 4″x5-1/4″
- Stocking paper to cut 3 stockings with dies
- Cinnamon Cider
- Mantel piece measures 3-1/2″x1″
- Basic White
- Inside panel measures 5-1/4″x3-1/8″
- Fireplace piece measures 3″x4-1/4″ before embossing
- Sentiment measures 3-1/4″x3/4″
- Scrap for candy canes
- Merry Merlot
- Stamp Pads
- Merry Merlot
- Real Red
- Sahara Sand
- Adhesive
- Stampin’ Seal
- Stampin’ Dimensionals
- Tools
- Bone Folder
- Take Your Pick Tool – Stylus end
- Blending Brush
- Water Painter
- Clear (Acrylic) Blocks B & H (Block A for pallet)
- Paper Trimmer
- Simply Scored Scoring Tool
- Stampin’ Cut & Emboss Machine
Instructions
Begin by folding your card base at 4-1/2″ and burnishing it with a bone folder for a nice, crisp fold.


On the stocking piece of DSP, cut out three stockings either by using the coordinating dies or by fussy cutting them out.


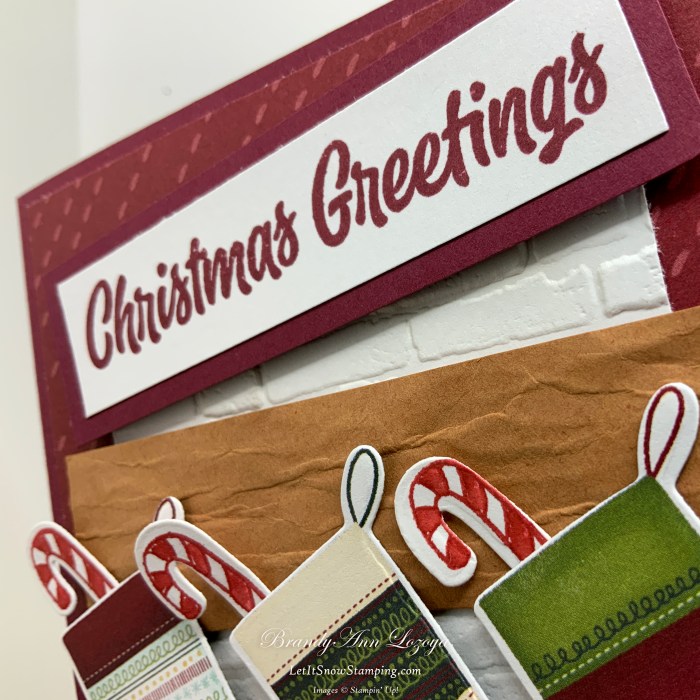
Emboss the white cardstock piece using the Brick & Mortar 3D Embossing Folder. Make sure to line up the side edge of the cardstock to the line on the folder to ensure the bricks are going the right way across the paper.


Adhere the DSP card front to the card base.

Adhere fire place brick to the bottom center of the DSP card front.

Using a stylus and foam pad, draw wavy lines on the mantel piece. I also pushed folds into the paper by hand for more variation of lines


Mount on card front using dimensionals.


Mount stockings on the mantel using dimensionals.


Stamp candy canes using Real Red ink onto scrap of white cardstock.

Next, color in candy canes with Real Red marker or use a water painter. In the photos, I used a water painter and pressed an acrylic block into the Real Red ink to pick up ink and use as a pallet.


Die cut or fussy cut the candy canes.

Add a bit of adhesive to the bottom of the candy canes and tuck into the top of the stockings..

I wanted to add a bit of highlight color to the bricks, so I used a Blending Brush and Sahara Sand ink.

Stamp the sentiment using Merry Merlot and mount onto sentiment mat.


Mount sentiment onto card front using dimensionals.


Adhere inside panel to card. You can stamp a sentiment inside or leave it blank.

The Final Project


When ordering use my name and the September 2021 host code for extra benefits
BrandyAnn Lozoya
A69ERDDQ
I hope you enjoyed today’s project. Make sure to subscribe to Let It Snow Stamping so you never miss another blog post. Every week I pick a stamp set and make one project every weekday. As an added bonus I also make videos for new techniques. The techniques can also be found under the Technique Corner tab.
Make sure you find LISS on:
Facebook (#LISStamping, @LetItSnowStamping),
Instagram (@LetItSnowStamping),
