Happy Stampin’ Thursday!
Sale-a-bration ends today!
Don’t miss out on free Sale-A-Bration rewards today! SAB ends tonight! With every $50 or $100 purchase you receive a free SAB item of your choice. Click on the following links to view the reward choices.
Anniversary Special
Now through September 30th
Buy one of the following sets to make special wedding and anniversary cards and receive a free package of the Pearl Basic Jewels*
- Forever Blossoms
- Always in My Heart
- Elegantly Said
- Art Gallery
*Orders must be placed via email and not through the online store to receive offer.

Forever Blossoms 151457 
Always in My Heart 158183 
Elegantly Said 155095 
Art Gallery 158201

September Special

Merry Snowflakes Bundle 
White 3/8″ Glittered Organdy Ribbon
September Special: Buy the Merry Snowflakes Bundle* (page 13 in the July-December Mini Catalog) and receive a roll of the White 3/8″ Glittered Organdy Ribbon FREE! (While Supplies Last)
*Orders must be placed via email and not through the online store to receive offer.
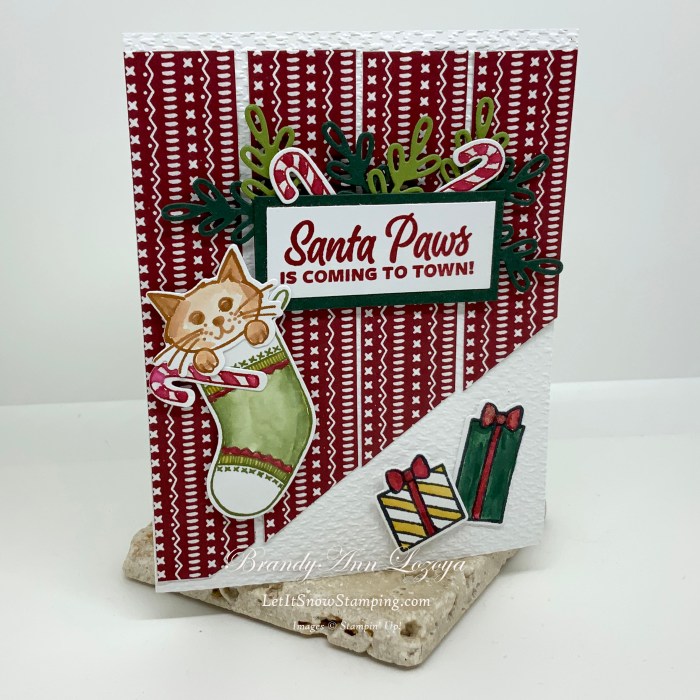
The Project
Level – Avid (Advanced)
Supply List
- Stamp Sets
- Sweet Little Stockings set
- Dies/Embossing Folders
- Stockings Dies
- Tasteful Textile 3D Embossing Folder
- Cardstock/DSP
- Basic White
- Card Base measures 5-1/2″x8-1/2″, scored and folded at 4-1/4″
- Sentiment measures 2-1/4″x7/8″
- Scrap pieces for stamped images
- Sweet Stockings Designer Series Paper
- Card front measures 4″x5-1/4″, before cutting
- Evening Evergreen
- Sentiment mat measures 2-1/2″x1-1/8″
- Scrap pieces for die cut
- Old Olive
- Scrap pieces for die cuts
- Basic White
- Stamp Pads
- Cherry Cobbler
- Old Olive
- Tuxedo Black
- Bumblebee
- Cinnamon Cider
- Evening Evergreen
- Stampin’ Blends/Markers
- Wink of Stella
- Adhesive
- Stampin’ Seal
- Stampin’ Dimensionals
- Multipurpose Liquid Glue
- Scotch Tape
- Tools
- Bone Folder
- Ruler
- Tweezers
- Water Painter
- Clear (Acrylic) Blocks A, C, & D
- Paper Trimmer
- Simply Scored Scoring Tool
- Stampin’ Cut & Emboss Machine
Instructions
Begin by folding your card base at 4-1/2″ and burnishing it with a bone folder for a nice, crisp fold.
**Your paper will be white! I forgot to take a picture of me folding the white, sorry!!**


On the DSP we will need to make two marks. Measure 1/2″ from the left on the short side of the DSP. Turn the paper clockwise and measure 2-1/2″ from the left on the long side.


Line up marks on your paper trimmer and make a diagonal cut.


Next, cut into 4 1″ strips.

Now, emboss the front of the card base.


Adhere DSP strips to the front of the card starting from the edges and then spacing the middle two pieces evenly.


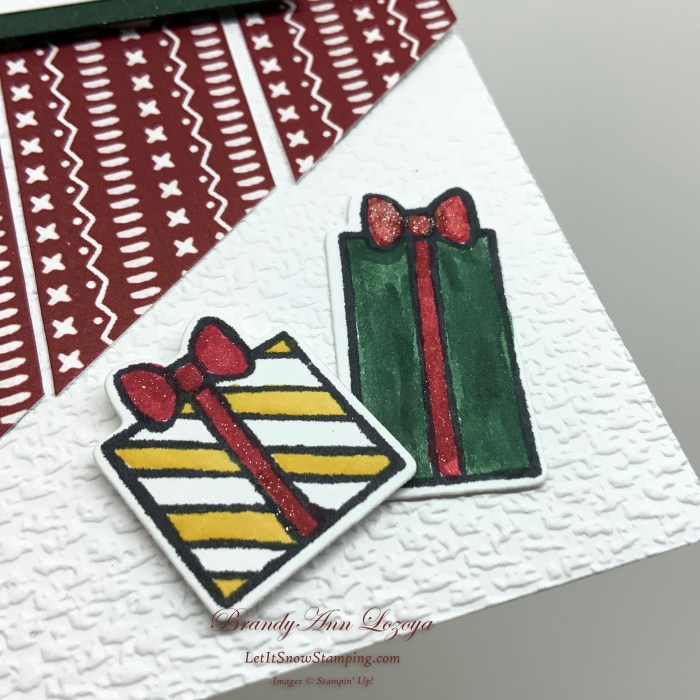
Stamp gift images using Tuxedo Black and color in using a water painter brush and ink. I used Cherry Cobbler, Evening Evergreen, and Bumblebee. I use the Clear Acrylic Block A as a pallet for my ink. Gently press block onto the ink pad to pick up a bit of ink to color with.

Die cut leaves. I cut 4 Evening Evergreen and 3 Old Olive leaves.

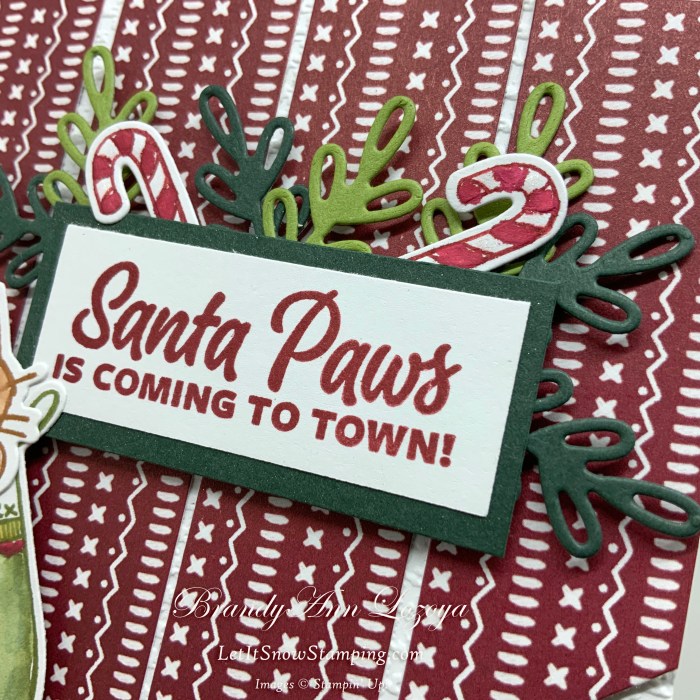
Stamp, color, and die cut candy canes. Candy canes are stamped and colored in Cherry Cobbler ink.


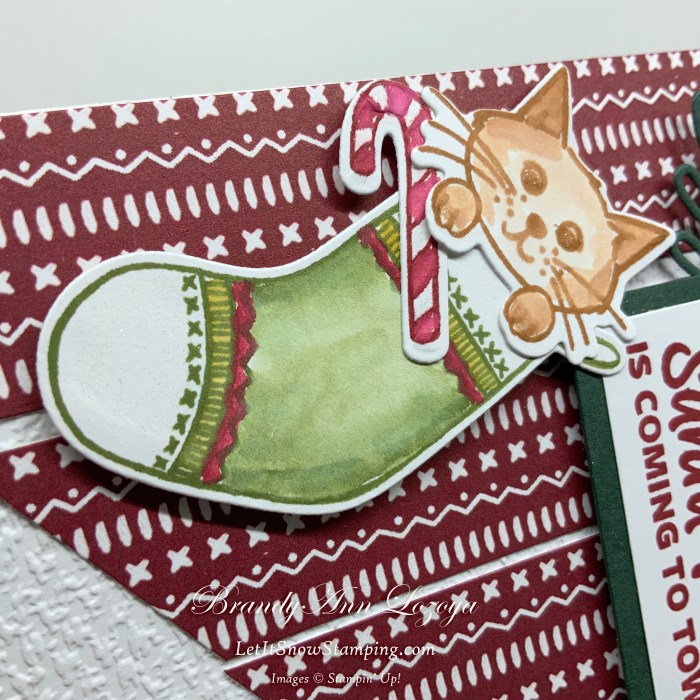
Stamp stocking in Old Olive and color. I used Old Olive, Bumblebee, and Cherry Cobbler.


Add Wink of Stella to the toe and top of stocking.


Carefully die cut stocking. As you can see, even I mess this up sometimes! My die moved as it was going under the roller, so I had to color everything again. On small pieces like this I don’t like to die cut first because it is harder to hold down while coloring. I guess that is the price I pay sometimes.

Stamp, color, and die cut cat. I used Cinnamon Cider ink.


Stamp sentiment in Cherry Cobbler and mount onto Evening Evergreen mat.


I decided I wanted my mat to sparkle, so I added some Wink of Stella to the mat.


Then I decided my candy canes and gifts needed a touch of Wink of Stella, LOL.

Adhere the large gift with Seal adhesive to the bottom right corner of the card. Adhere the smaller gift using a dimensional.

Tape cat to the stocking. I find tape to be a cheap and great way to stick pieces together without the mess. I am able to move things around easily until I am ready for them to be permanent.

Tape cat stocking to the back of the sentiment as well as the leaves in mixed pairs.


With a dab of liquid glue, glue candy cane next to the cat’s paw.

Add dimensionals to the back of the decorated sentiment to adhere to the card front. I found that an edge piece from the dimensionals sheet worked great as well!

Add sentiment piece to the card front, centering it on the upper half of the card.

The Final Project


When ordering use my name and the September 2021 host code for extra benefits
BrandyAnn Lozoya
A69ERDDQ
I hope you enjoyed today’s project. Make sure to subscribe to Let It Snow Stamping so you never miss another blog post. Every week I pick a stamp set and make one project every weekday. As an added bonus I also make videos for new techniques. The techniques can also be found under the Technique Corner tab.
Make sure you find LISS on:
Facebook (#LISStamping, @LetItSnowStamping),
Instagram (@LetItSnowStamping),
