Happy Stampin’ Thursday!
Announcements:
Tomorrow night (Friday May 7th) I will be hosting a Open Craft Night via GoTo Meeting, at 7pm Central Time, 8pm Eastern Time, 5pm Pacific Time, and 6pm Mountain Time. We are usually crafting for at least an hour, if not more. This can be a time for you to make cards, scrapbook, or any other types of crafts. This is a weekly event unless otherwise noted. If you would like an invite to the meeting, leave a comment below or email LetItSnowStamping@gmail.com.
Today’s Project:
I do not think I have ever used so much Designer Series Paper in one week before! However, I just adore this paper and stamp set so much! I almost did the same thing I did on Monday and just highlight the background DSP with frames instead of covering it up. But alas, I covered it up (and I just noticed that I covered almost all of the Highland Heather flowers that matched the card base!).

Supplies:
- Hand-Penned Petals stamp set
- Highland Heather cardstock
- Hand-Penned Designer Series Paper
- White Crinkled Seam Binding Ribbon
- Tape
- Basic White cardstock
- Highland Heather, Daffodil Delight, Mint Macaron, and Pool Party ink pads
- Double Oval Punch
- Stampin’ Dimensionals
Instructions:
Start with a Highland Heather card base measuring 8-1/2″x5-1/2″, scored and folded at 4-1/4″ and a piece of DSP measuring 4″x5-1/4″.

Cut two 6″ lengths of ribbon and two 4″ lengths of ribbon. Set aside the 4″ lengths.
Fix the two 6″ lengths of ribbon as shown on the photo below.

Adhere the ends of the ribbon on the backside of the DSP with tape. Add Seal Adhesive to mount the DSP to the card base.

Mount the DSP to the card base.

From the Basic White cardstock, cut three squares measuring 1-1/2″x1-1/2″. Though it is not pictured, also cut three squares from Highland Heather cardstock measuring 1-3/4″x1-3/4″ for matting.

Stamp floral stem images using Mint Macaron. Add blossom stamp using Highland Heather, Pool Party, and Daffodil Delight. Then mount the squares to the Highland Heather mats.

Align the Highland Heather blossom first as shown below in a diamond orientation. Do not adhere to the card base until you are sure the other two squares align correctly.

These are glued down using either Seal Adhesive or Multipurpose Liquid Glue.

Use the two 4″ lengths of ribbon to make simple knots on the two lengths of ribbon secured to the card front. Slide them where you like. Here, I positioned one closer to one diamond and the other closer to the second diamond.

On a scrap of Basic White cardstock, stamp your sentiment in Highland Heather ink and cut out using the Double Oval Punch. Grab a Highland Heather cardstock scrap, punch out the scalloped matting using the Double Oval Punch. Glue both pieces together and mount on the card front using Stampin’ Dimensionals.
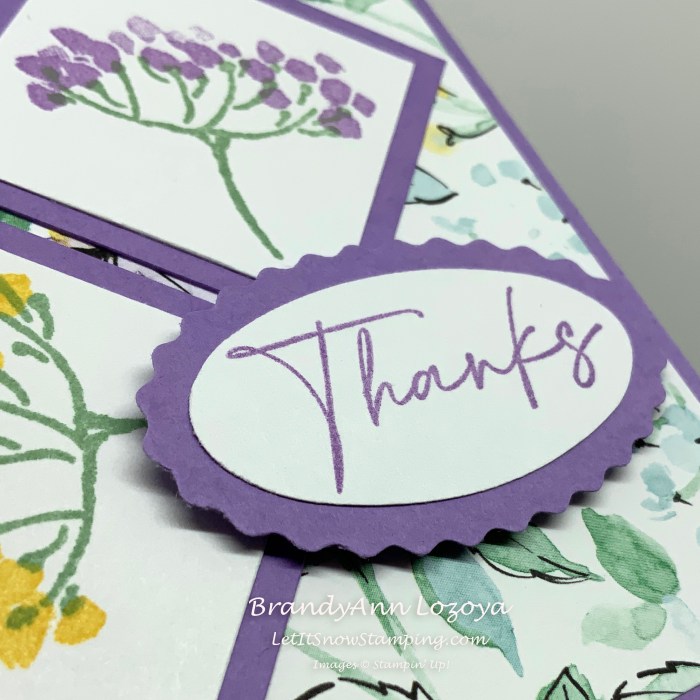
What I love about this style of card, is that you can use any of the blossoms in the stamp set in the diamond squares, even if you only see a portion of the blossom. It creates a fun focal point for your card.

New Feature!
Downloadable step-by-step PDF instructions
I am trying a new feature for this blog post this week. A printable version of the blog post in PDF format which includes the supply list. Let me know in the comments if this is something I should do for other step-by-step blog posts.
I hope you enjoyed today’s project. Make sure to subscribe to Let It Snow Stamping so you never miss another blog post. Every week I pick a stamp set and make one project (possibly two) every weekday. As an added bonus I also make videos for new techniques. The techniques can also be found under the Technique Corner tab.
Make sure you find LISS on:
Facebook (#LISStamping, @LetItSnowStamping),
Instagram (@LetItSnowStamping),
