Happy Stampin’ Friday!
I hope everybody is ready for the weekend! I will have a busy one trying to get my son ready to attend the last two weeks of school in person. He has been one awesome kid to deal with remote learning all year. I did not want him to miss out on the end of school activities with his friends. As much as the teachers try, it is not the same, especially when the class goes outside for activities and cannot take the iPad with them so my son can participate.
Announcements:

Starting today, new Paper Pumpkin subscribers can buy the Batter Up! Paper Pumpkin kit for just $5!
Make sure to use the Promo Code at check out for the Special New Subscriber price of $5! Last day to place your order is Monay, May 10th! Simply click on the photo above to subscribe.
“Step up to the plate, take a swing, and knock it out of the park! With the Batter Up! Paper Pumpkin Kit, it’s your turn to go to bat for all the people who’ve gone to bat for you. This month’s timeless kit with a “throwback” theme contains enough grand slam supplies to create nine cards—and coordinating envelopes—featuring classic colors, pinwheel and pinstripe patterns, and vintage-washed paper pieces. There’s no “batter” way to root, root, root for your home team and honor the all-stars in your life!
A beloved baseball-themed kit would be incomplete without the sport’s signature, sticky snack—the official bubble gum of the MLB! A favorite in the field, the Batter Up! Paper Pumpkin Kit contains a couple sticks of the chewy staple; chew while you craft, slide a piece into a card, or save it for later.”

- The new 2021-2022 Annual Catalog launched yesterday and with it, so did a new promotion!
- From 4 May–14 June 2021, qualifying orders will receive our generous Stampin’ Rewards PLUS additional rewards! Hosts can earn Stampin’ Rewards based on order totals for an entire party. Outside of the party setting, Stampin’ Rewards are available to those who place individual orders that meet the order totals.
- For any individual or party orders totaling a minimum of $250, earn an additional $25 in host rewards on top of the normal host rewards!
Today’s Project
Wow! A whole week of using Designer Series Paper! I never do that, LOL! It is such springy paper, it makes me smile, and it is easy to use.

Supplies:
- Misty Moonlight Cardstock
- Hand-Penned Designer Series Paper
- Basic White Cardstock
- Garden Green Cardstock
- Vellum Cardstock
- Misty Moonlight, Garden Green, Pale Papaya, and Tuxedo Black Stamp Pads
- Genial Gems
- Stampin’ Dimensionals
- Stampin’ Seal Adhesive
- Mini Glue Dots
Instructions:
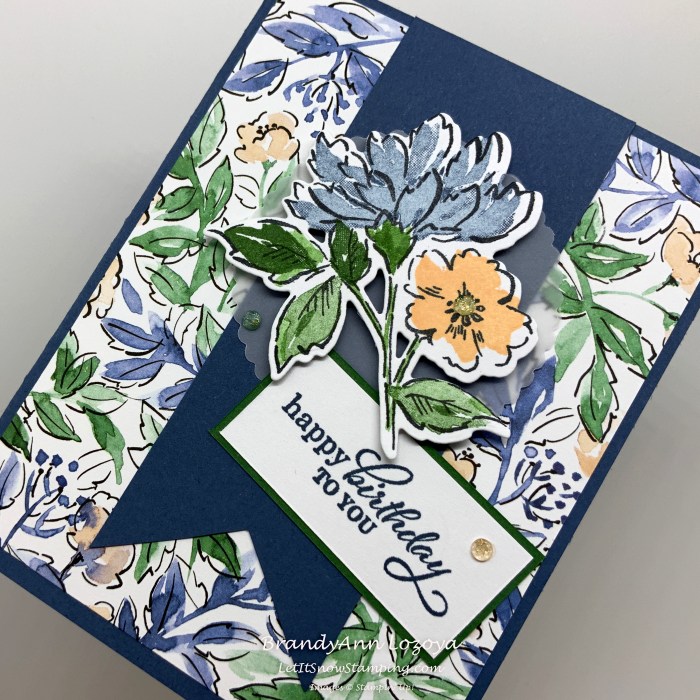
We will start with a card base measuring 8-1/2″x5-1/2″, scored and folded at 4-1/4″ and a DSP card front measuring 4″x5-1/4″.

Mount the DSP to the card base using Stampin’ Seal Adhesive or Multipurpose Liquid Glue.

Cut a 2″x4-1/2″ strip of Misty Moonlight Cardstock and cut one end into a banner edge. Glue it to the center of your card as shown below.

On a scrap piece of Basic White Cardstock stamp the focal image for your card.
Here, I am using the Stamparatus. First, I place the paper on my stamping platform and hold it down with the provided magnets (that I covered in painters tape for easier handling). Next, place your stamp, image side down, where you want to stamp the image.

Next, swing the plastic plate over and press to pick up the stamp.

Ink up your stamp and swing the arm back onto the paper and press evenly. If your image is not dark enough or is lighter in some areas, do this step again, without moving the paper.

Once your image is to your liking, remove the magnets, careful not let them stick together as they may break.

Using the filler stamps for the blossoms and flowers, stamp the large blossom in Misty Moonlight. If you look on the right, you can see where I was testing the color, to see what I liked best. The darkest was stamped directly from the stamp pad, then I stamped again without re-inking 2 times, the image getting lighter each time. This is called “Stamping Off”. I decided that I liked the 2nd image best.

After stamping all of the blossoms and leaves, fill in the remaining parts of the stem using a Water Painter and Garden Green stamp pad.

Cut out the floral image using the coordinating dies, Penned Flowers Dies, and your die cutting machine.


Add Stampin’ Dimensionals to the floral image. This image was a good one to use all of those side bits on the Stampin’ Dimensionals sheet!
Cut out a Vellum Cardstock circle with the Layering Circles Dies. I used the second largest scallop circle die.
Attach the floral image to the vellum circle.

In order to make sure your Glue Dots do not show through the vellum, attach the Glue Dots where the floral image is at. I tried taking a photo of the Glue Dots, but they are hard to see.
Adhere this to your card front, centering on the banner strip.

Cut out a 2-1/4″x1″ rectangle for your sentiment. Stamp sentiment in Misty Moonlight. Mat onto a Garden Green piece of cardstock measuring 2-3/8″x1-1/8″. Adhere to card front.

Add a few Genial Gems to the card front. I added one to the center of the Pale Papaya blossom.
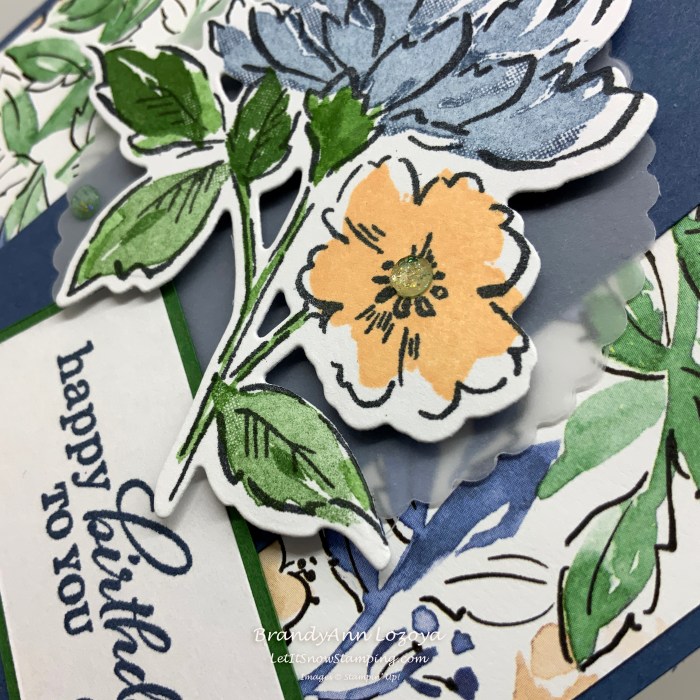
I added one to the sentiment and the other on the bottom left side of the vellum circle.
New Feature!
Downloadable step-by-step PDF instructions
I am trying a new feature for this blog post this week. A printable version of the blog post in PDF format which includes the supply list. Let me know in the comments if this is something I should do for other step-by-step blog posts.
I hope you enjoyed today’s project. Make sure to subscribe to Let It Snow Stamping so you never miss another blog post. Every week I pick a stamp set and make one project (possibly two) every weekday. As an added bonus I also make videos for new techniques. The techniques can also be found under the Technique Corner tab.
Make sure you find LISS on:
Facebook (#LISStamping, @LetItSnowStamping),
Instagram (@LetItSnowStamping),
