Happy Stampin’ Tuesday!
Holy Smokes! Just got done watching a thunderstorm roll through here. The sky was pitch black and we were worried of a power outage. I love storms, but when there is hail and I need to walk to the bus stop soon, equals a not so happy mama, LOL. Luckily it finished just before I had to go out.
Today I decided to play with Flirty Flamingo and the Happy Holly-Days set and here is what I came up with. Not my best card, but I suppose it turned out OK. The balance is off and that bothers me. It is a little bottom heavy for my taste. Anyway….
The Project
Level – Avid (Advanced)

Supply List
- Stamp Sets
- Happy Holly-Days Cling Stamp Set
- Die Sets
- Layering Circles Dies
- Cardstock
- Flirty Flamingo
- Card Base measures 5-1/2″x8-1/2″, scored and folded at 4-1/4″
- Scrap for scalloped circle die cut
- Pattern Party Designer Series Paper (DSP)
- 3-3/4″x5″
- Basic White
- Card front measures 3-1/4″x4-1/2″
- Inside panel measures 5-1/4″x4″
- Sentiment measures 3-3/4″x3/4″
- scraps for stamped image and circle die cut
- Pear Pizzazz
- Sentiment mat measures 3″x1″
- Ribbon mat measures 3″x3/4″
- Flirty Flamingo
- Classic Stampin’ Pads
- Flirty Flamingo
- Tuxedo Black
- Pear Pizzazz
- Poppy Parade
- Embellishments
- Pearl Basic Jewels
- Flowers for Every Season Ribbon Combo Pack (White)
- Early Espresso Faux Suede Trim
- Adhesive
- Stampin’ Seal
- Mini Stampin’ Dimensionals
- Mini Glue Dots
- Tools
- Bone Folder
- Paper Snips Scissors
- Water Painters
- Clear (Acrylic) Blocks
- Take Your Pick Tool
- Paper Trimmer
- Stamparatus
- Simply Scored Scoring Tool
- Mini Stampin’ Cut & Emboss Machine
Instructions
Score and fold your Flirty Flamingo card base and burnish with a bone folder for a nice crisp fold.
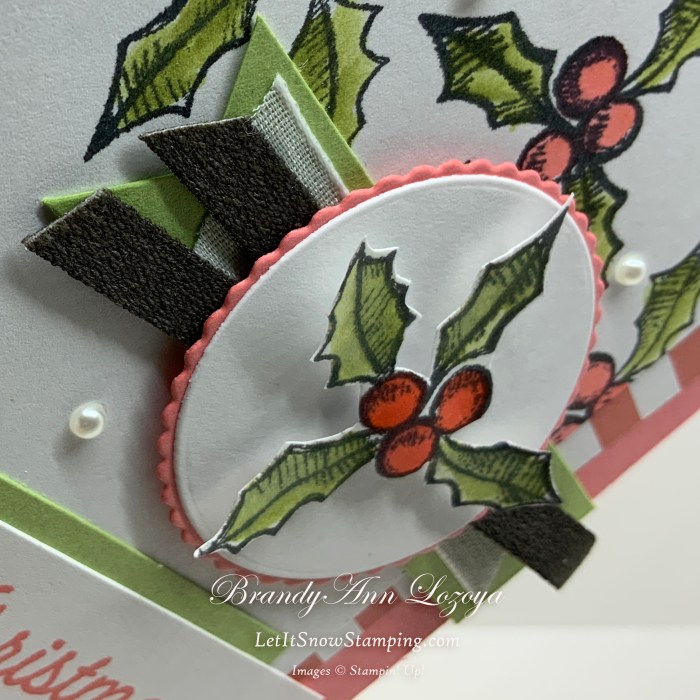
Instead of using my acrylic blocks today, I used my Stamparatus to stamp my holly images. When I am using a stamp set for the first time, I tend to use my Stamparatus to make sure I can re-stamp if my image did not come out complete the first time.
Using my Stamparatus I was able to reposition my holly where I needed before inking up my stamp each time.


Next, I stamped a small acrylic block into my ink pad. This is used as my pallet, to draw ink from, as I color the holly with a Water Painter brush.


Next, adhere card front to the DSP layer a little bit off kilter. Then adhere card front to the card base, again, a little off kilter but in the opposite direction.


Now, take the Ribbon Mat and trim one edge into a banner edge.

Next, adhere it to the card base. Adhere it to the right edge of the card base and at the bottom half of the holly. (The top of my card is to the right)

Taking a roughly 3″ piece of white ribbon, cut one edge diagonally and line up the point to the edge of the card as shown in the first picture below. If the ribbon is longer than the Ribbon Mat, trim with snips. Glue down using Stampin’ Seal adhesive.
Next, cut a 6″ length of the Faux Suede Trim and fold in half. Glue ribbon down using Mini Glue Dots


Stamp another holly image on a scrap of Basic White and color as before. Fussy cut the holly and add a Mini Stampin’ Dimensional to the back.


Die cut a scalloped circle from Flirty Flamingo and a regular circle from Basic White. Glue together as shown.


Attach holly image to the center of the circle die cuts.
Using the edges of the Stampin’ Dimensionals sheet, cut two lengths and attach them as shown. The reason for the gap is because the ribbon will run along the gap, allowing the circles to lie evenly flat.


Attach circle element over ribbon.

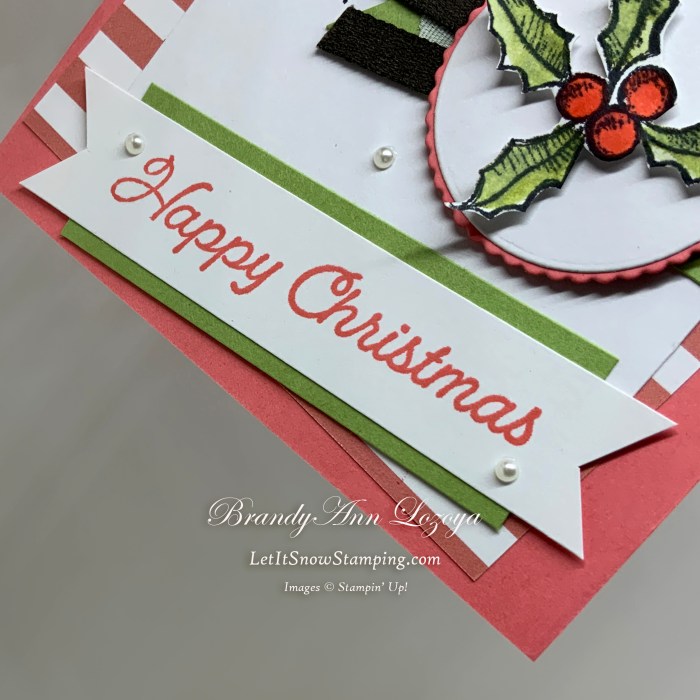
Stamp sentiment in Flirty Flamingo.
Cut banner edges on both ends of the sentiment. Adhere to the green Sentiment Mat.
Attach to card front at a slight angle.


Embellish with Pearl Basic Jewels.

The Final Project

Announcements:
Virtual Party
Virtual Party: On September 11, 2021, I will be hosting a Virtual Party where I will be showcasing two projects using two of the holiday bundles from the new July-December Mini Catalog, as well as doing fun giveaways!
If you book an event during the Virtual Party, you will receive one free Classic’ Stampin’ Pad of your choice on top of the regular hostess rewards.
September Special

Merry Snowflakes Bundle 
White 3/8″ Glittered Organdy Ribbon
September Special: Buy the Merry Snowflakes Bundle* (page 13 in the July-December Mini Catalog) and receive a roll of the White 3/8″ Glittered Organdy Ribbon FREE! (While Supplies Last)
*Orders must be placed via and not through the online store.
When ordering use my name and the September 2021 host code for extra benefits
BrandyAnn Lozoya
A69ERDDQ
I hope you enjoyed today’s project. Make sure to subscribe to Let It Snow Stamping so you never miss another blog post. Every week I pick a stamp set and make one project every weekday. As an added bonus I also make videos for new techniques. The techniques can also be found under the Technique Corner tab.
Make sure you find LISS on:
Facebook (#LISStamping, @LetItSnowStamping),
Instagram (@LetItSnowStamping),
