Happy Stampin’ Friday!
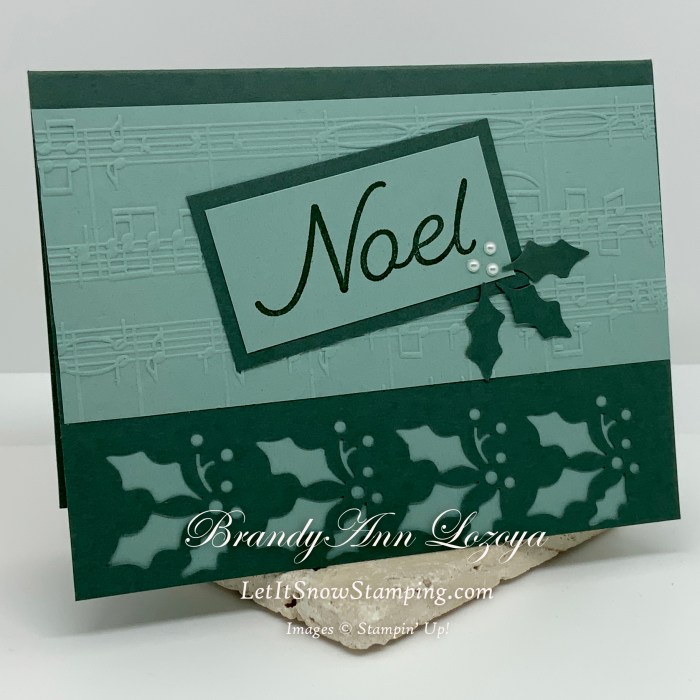
I really loved how this card turned out today. I knew I wanted to have at least one card this week use the entire Happy Holly-Days bundle, which includes the Happy Holly-Days Cling Stamp Set and the Holly Border Punch. When you purchase the two items together in a bundle, you save 10%!
Once I decided on my layout, it was a quick card to make. This particular card is great for mass production with a limited number of consumable supplies. With one package of Evening Evergreen cardstock, for example, you will be able to make about 42 card bases and have enough extra for the sentiment mats!
The Project
Level – Casual (Intermediate)

Supply List
- Stamp Sets
- Happy Holly-Days Cling Stamp Set
- Die Sets/Embossing Folder
- Holly Border Punch
- Merry Melody 3D Embossing Folder
- Cardstock
- Evening Evergreen
- Card Base measures 5-1/2″x8-1/2″, scored and folded at 4-1/4″
- Sentiment Mat 2-3/4″x1-1/2″
- Soft Succulent
- Two Inside panels measure 5-1/4″x4″
- Embossed layer measures 5-1/2″x2-1/2″, before embossing
- Sentiment layer measures 2-1/2″x1-1/4″
- Evening Evergreen
- Classic Stampin’ Pads
- Evening Evergreen
- Embellishments
- Pearl Basic Jewels
- Adhesive
- Stampin’ Seal
- Multipurpose Liquid Glue
- Tools
- Sharpie Marker
- Bone Folder
- Clear (Acrylic) Blocks (D & H)
- Take Your Pick Tool
- Paper Trimmer
- Simply Scored Scoring Tool
- Stampin’ Cut & Emboss Machine
Instructions
Let’s begin with a neat little trick I learned while making mass produced cards.
Begin by scoring an entire sheet of 8-1/2″x11X” Evening Evergreen cardstock at 4-1/4″.
Using your Paper Trimmer, cut sheet in half at 5-1/2″. Now you have two scored card bases to make two cards.


Fold and burnish the card base with a bone folder for a crisp fold.

This is the first time I have used my Holly Border, so I need to prep it. What I mean by “prep it” is that I need to find and mark the spot that will allow me to punch on the 5-1/2″ side of the card and have the punching come out centered.
After testing the punch on some regular scrap paper that was cut to 5-1/2″ in length, I was able to pin point where my paper needed to line up for the first punch.
With this stamp, it was the mid point between the pre-printed mark and the edge of the dark colored top piece. I made a mark with my Sharpie maker on the side of my punch that I could see while punching. Now, I know I need to place the edge of my paper at this mark for the first punch.


For the second punch, you will want to make sure that the punched out part lines up with the silver markings. When they are in place, punch a second time. As long as you continue to carefully match the punched area with the silver markings, your border will come out perfectly spaced each time, no matter how long your paper’s edge is.

I really do love this punch! Now, take on of the inside panels and glue it carefully to the inside. Make sure your glue does not show through the holly leaves. I used Stampin’ Seal and put little bits on the larger areas between the berries and along the top and middle of the panel. (Sorry, I should have taken a picture! Just know that this panel goes on the top flap when you open the card, directly behind the punched border.)


Save these little bits in a zipper bag! Never waste these little bits that can be used for confetti or shaker cards!

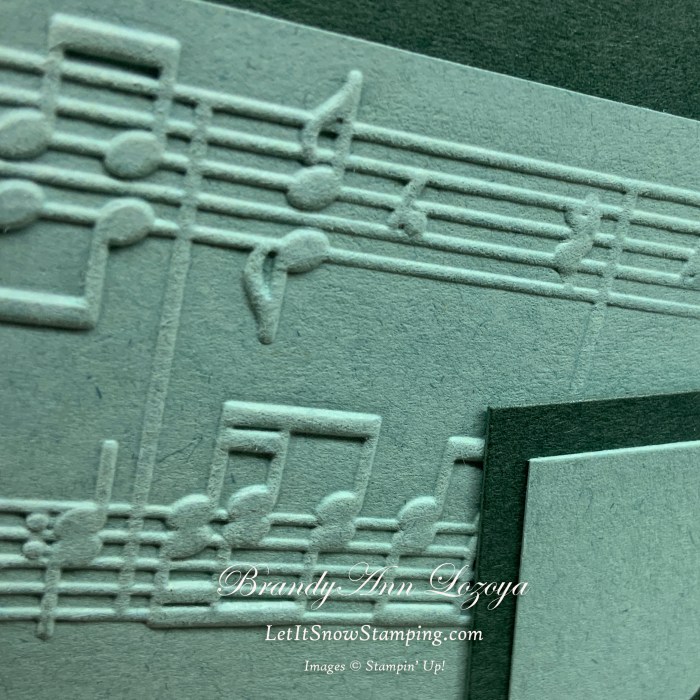
Time to break out my new Merry Melody 3D Embossing Folder. I have been waiting for a sheet music embossing folder! Especially when I have a son in band!
As you will notice in the first picture, each Stampin’ Up! embossing folder will have the logo and a thin black like across the bottom. This line is a guide to help you place the paper for a straight embossed image. I totally need this! I am always at a tilt if you haven’t noticed in my pictures, LOL!
Align the paper and run through your Stampin’ Cut & Emboss Machine.


Here it is, all nice and straight!

Adhere the embossed piece to the card front, centering it between the folded edge and the top of the holly leaves.

Stamp sentiment, using Evening Evergreen ink, onto the small Soft Succulent sentiment layer.
Mat the sentiment layer onto the Evening Evergreen sentiment mat.


Adhere sentiment onto embossed layer at a tilt, as shown below.

Remember the holly leaves I had you keep in a zipper bag? Get three of the larger holly leaves for the next step.
Using Multipurpose Liquid Glue, dab a small dot onto each leave and glue to the sentiment in a holly-like arrangement.


Now, add three pearl “berries” next to the holly leaves using your Take Your Pick Tool.

Since these are going to be Christmas cards, I will add a sentiment and decorative element to the inside panel.
Stamp the sentiment, using Evening Evergreen, in the center of the Inside Panel piece, followed by the decorative element, in this case the holly stamp.


Adhere inside panel to the inside of your card.

When I am mass producing cards, I will cut all of my pieces and put them in little wooden boxes I bought at the Dollar Tree. I also fold all of my card bases and burnish them with a bone folder before putting them in their Dollar Tree box.
Next, I will stamp all of my sentiments. Then, punch out the borders. To give my hand a break, depending on how many I do, I will also work on the embossing the embossed pieces in between.
At this point I can now begin assembling the cards! The last thing I will do is add the embellishments, such as the Pearl Basic Jewels.
If you have ANY questions, feel free to comment below and I will answer them ASAP!
I hope this helps give you a look at how I mass produce cards!
The Final Project


Announcements:
Virtual Party
Virtual Party: On September 11, 2021, I will be hosting a Virtual Party where I will be showcasing two projects using two of the holiday bundles from the new July-December Mini Catalog, as well as doing fun giveaways!
If you book an event during the Virtual Party, you will receive one free Classic’ Stampin’ Pad of your choice on top of the regular hostess rewards.
September Special

Merry Snowflakes Bundle 
White 3/8″ Glittered Organdy Ribbon
September Special: Buy the Merry Snowflakes Bundle* (page 13 in the July-December Mini Catalog) and receive a roll of the White 3/8″ Glittered Organdy Ribbon FREE! (While Supplies Last)
*Orders must be placed via and not through the online store.
When ordering use my name and the September 2021 host code for extra benefits
BrandyAnn Lozoya
A69ERDDQ
I hope you enjoyed today’s project. Make sure to subscribe to Let It Snow Stamping so you never miss another blog post. Every week I pick a stamp set and make one project every weekday. As an added bonus I also make videos for new techniques. The techniques can also be found under the Technique Corner tab.
Make sure you find LISS on:
Facebook (#LISStamping, @LetItSnowStamping),
Instagram (@LetItSnowStamping),
