Happy Tuesday!
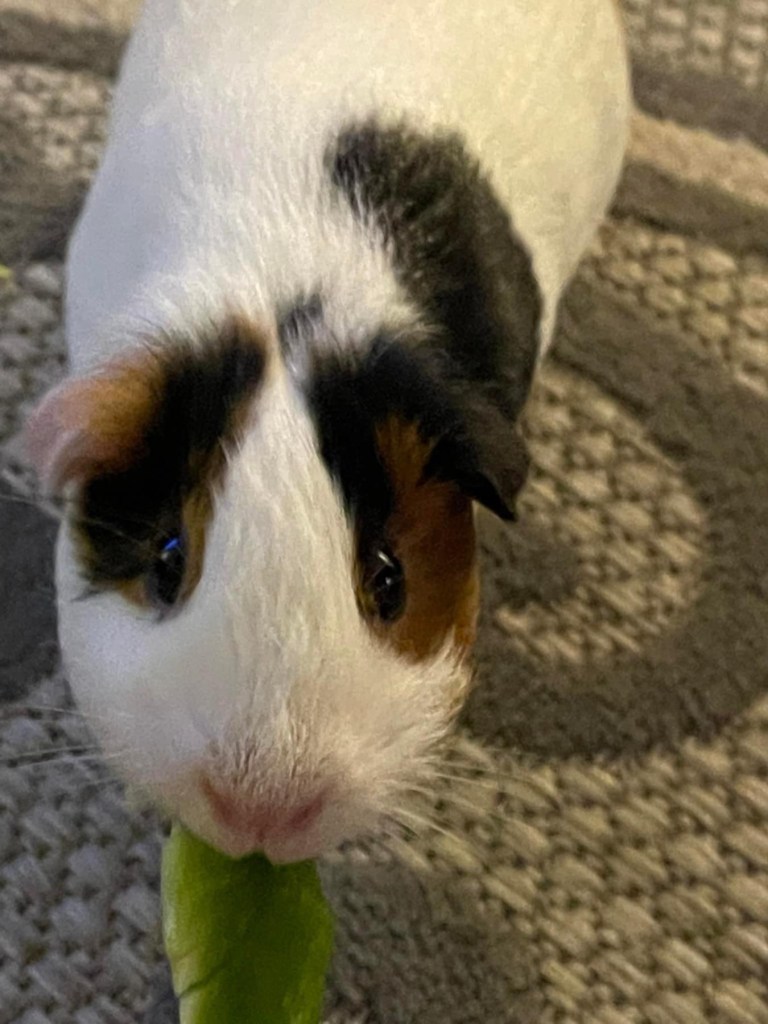
Today I am a little bit late in posting because it was “Clean the Guinea Pig Cages Day”!! Doesn’t that sound like an exciting adventure?? Yeah, I don’t think so either. We have three critters and two large cages, so it takes some time to get it all done. But, “The Sweets”, as we call them, are happy in their nice clean cages.
Why do we call them “The Sweets”? When we adopted our hamster our youngest child named her Nugget. I am told that she looked like a chicken nugget <SMH>. About a year later we adopted our first Guinea Pig and he named her Cookie. The first thing I thought was that he named them after his favorite foods, LOL!! After Nugget passed away we adopted two sister Guinea Pigs to keep Cookie happy. We didn’t really like their original names, so we changed them. Our youngest named one Oreo, keeping with his food theme, and our oldest son named the other one Snickers, because I could not think up another food name! Of course most of the time I want to call her Peanut because she doesn’t look like a Snickers to me!
Let me introduce you to The Sweets…


Nugget was our one and only hamster. She was too quick for me, LOL. I like to hold my pets and not have to keep moving my hands to keep hold of them. However, she was a cutie and is greatly missed. I used to hamster-sit while I made cards, LOL. She would roll around my office in her Hamster Ball, exploring all she could. She would actually torment the dogs by running full speed into them in her ball. It was a riot! I would have thought she would have been afraid of the dogs, but not this hamster!
Beautifully Happy Sale-A-Bration Set
Now, let’s get going on what you actually came to see!

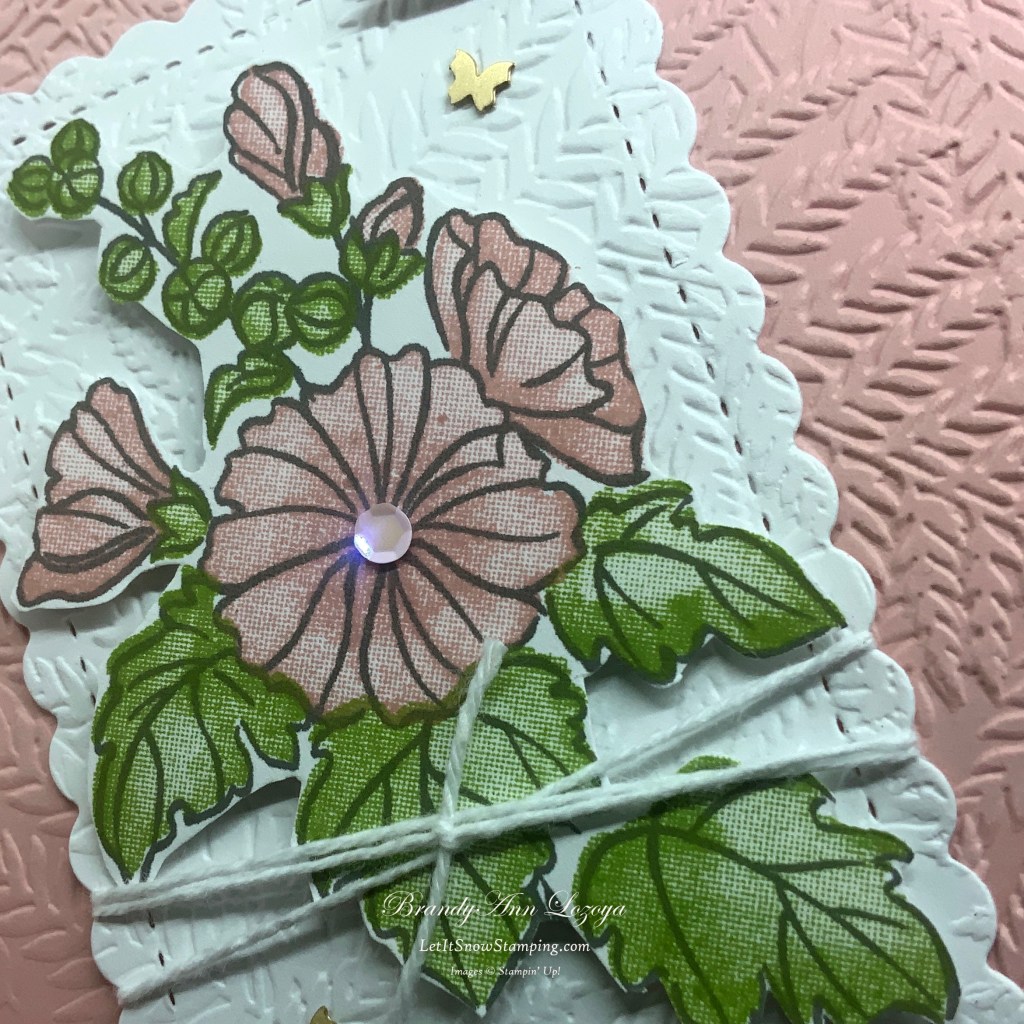
I am really enjoying this Sale-A-Bration stamp set! Today I decided to fussy cut the large flower stem and pop it up with Stampin’ Dimensionals.
Supplies:
- Card Base – Blushing Bride
- 8-1/2″ x 5-1/2″, folded at 4-1/4″
- Card Front
- Basic White, 4″ x 5-1/4″
- Blushing Bride, 4″ x 5-1/4″
- Scrap of Basic White large enough for image stamp
- Inside Mat
- 4″ x 5-1/4″
- Scrap for Sentiment
- Basic White, 5/8″ wide
- Stamp Pads
- Basic Gray
- Blushing Bride
- Granny Apple Green
- Embellishments
- White Baker’s Twine (Item #155475)
- Pastel Adhesive Backed Sequins (Item #160387)
- Brushed Brass Butterflies (Item #158136)
- Tools
- Scalloped Contours Dies (Item #155560)
- Fern 3D Embossing Folder (Item #158804)
- Stampin’ Dimensionals (Item #104430)
- Paper Snips Scissors (Item #103579)
Let’s Make This!
First we want to fold the card base in half and burnish it with a bone folder for a nice crisp crease. If you don’t have a bone folder, your finger nail or your stamping block will work as well.


Next, emboss the Blushing Bride and Basic White panels with the Fern embossing folder, or whatever you have on hand. Adhere the Blushing Bride embossed panel to your card base.


Next, die cut the white embossed panel with the second largest frame from the die set. I centered it so I could save the frame for another project.


On the Basic White scrap, stamp your image with all the colors (Look back to yesterday’s blog if needed). Fussy cut the image using your snips. Then add Dimensionals to the back. I used the edge pieces so they didn’t go to waste.


Next, adhere the floral image to the die cut. Then, wrap twine around the bottom half and tie with a shoelace knot. Trim ends of twine if needed.


Using a tape runner, adhere white die cut to the card front.

Now, embellish with sequins and butterflies. I used a pink sequin in the center of the large flower and added two butterflies around the flowers using my Take Your Pick Tool.


On the 5/8″ strip of white cardstock, stamp your sentiment in Blushing Bride. Using your snips, make banner edges on the sentiment. Need to learn how to make banner edges in more detail, visit the HOW TO… page to watch a quick video.


Using Dimensionals, adhere sentiment to card front.


To finish off the card, add the inside writing mat. You can stamp an image or sentiment on it before you adhere it to the inside of your card as well!

Up close & personal


I hope you enjoyed today’s Beautifully Happy card! If you recreate this card, please tag it on Facebook using #LISStamping or share it on the group page @lisstamping!
Have a Stamptastic Day!
~BrandyAnn
Subscribe to LISS today!
Make sure to subscribe to Let It Snow Stamping so you never miss another blog post. Every week I pick a stamp set and make one project every weekday. As an added bonus I also make videos for new techniques. The techniques can also be found under the Technique Corner tab. Enter Email Below to Subscribe!
When ordering use my name and the January 2023 host code for extra benefits
BrandyAnn Lozoya
EVWWHJNT
Make sure you find LISS on:
Facebook (#LISStamping, @LetItSnowStamping),
Instagram (@LetItSnowStamping),
YouTube (@LetItSnowStamping)
